I needed to build a very low-cost XR solution. During my research I looked at several domestic options and mainstream platforms like Hecoos, and decided to use Aximmetry as the demo solution during the evaluation period. What follows is everything I actually used from Aximmetry during this test.
Differences Between Editions
Studio Edition: Suited for very small or home studios — think YouTube creators and the like. It lets you use multiple cameras on a single PC through HDMI or USB capture devices, produce one or more video outputs via the GPU’s HDMI/DP/DVI ports, and stream output directly to YouTube, Facebook, Twitch, or any RTMP-based service. The watermarked Studio version can be used for non-commercial purposes indefinitely; a subscription plan removes the watermark.
Professional Edition: Designed for small professional studios. Supports up to 4 SDI/NDI input/output ports on a single PC (e.g., 3 SDI camera inputs and 1 SDI composite output) without any camera tracking solution — it relies purely on fixed cameras and virtual camera movement.
Broadcast Edition: For professional studios that need camera tracking. Supports an unlimited number of SDI/NDI input/output ports on a single PC (limited only by hardware), and also works in multi-PC configurations. It includes advanced mixed reality features: multi-camera tracking, industry-standard chroma keyers, high-quality real-time graphics, and automatic calibration of camera offset and lens distortion.
Installation and Setup
Environment Overview
Software
Version
Notes
Aximmetry Composer
The main application used for compositing and receiving tracking data.
Aximmetry UE
Aximmetry’s own fork of UE. They’ve modified the rendering pipeline (presumably to enforce the watermark). This version is based on UE 5.5. You can see two custom plugins in the engine’s plugin directory. The source is included and no external libraries are pulled in, but Aximmetry has altered the rendering pipeline — my guess is anti-piracy.
UE Project
5.5
A scene built with Aximmetry UE. I recommend also creating a vanilla UE 5.5 project alongside it, so you can recompile plugins and test them in a clean environment.
Creating a Basic Project
Project Settings
In Composer’s startup settings, the main things to configure are: the input section on the left (your live-action camera input), the output size on the right (final composited output resolution), and the UE render settings at the bottom.
Node Setup
VirtualCam node: Add a camera to the project and wire it as shown.
Main node: Add the camera and project here, and switch it to Live mode.
Green: Add a test video clip here — a green screen clip works fine. Aximmetry will key it automatically.
Camera Tracking: The camera tracking node. You’ll need to enter AximmetryEye in its options shortly.
Once set up, click the Play button in Composer and let the project run in editor mode. You should see a composited image immediately.
UE Scene Setup
Add a camera to the scene.
Setting Up Camera Movement
Manual Control
Here you can configure the camera’s motion properties. A and B represent the start and end points. Click the leftmost button to start the camera moving.
Clicking the edit button in “Camera/Render Settings” lets you drag the camera position directly in Aximmetry’s rendered output window. Use the ↑↓←→ buttons to fine-tune the camera coordinates.
iPhone Camera Tracking
Download the Aximmetry Eye app from the iOS App Store. Then connect via a wired ethernet cable (critical — wireless gave me issues). I’d also recommend attaching a heat sink to the phone; otherwise it gets too hot and disconnects, and tracking data goes haywire. When connecting, select Send Tracking Data (as shown) since we only need the camera pose data. Once connected, you’ll see the phone appear as an option in the Camera Tracking node’s detail panel on the Flow page.
The position and orientation of the iPhone at initialization time becomes the scene’s origin point.
Refer to the reference links at the bottom — some include video demos.
Camera FOV Calibration
FOV can also be calibrated manually, since the lens markings on most cameras aren’t particularly accurate. You need precise calibration. Pan the camera left/right or up/down in the composite view: if the virtual image rotates faster than the real world, reduce Zoom; if it rotates slower, increase Zoom.
Manual Extrinsic Calibration for iPhone
First, add an Actor above the camera and name it CameraLocation.
Aximmetry’s logic is: the camera spawns at the origin, then offsets by the delta from Aximmetry Eye on the phone to determine the camera’s runtime position.
So you need to update CameraLocation’s position to match the physical distance between the real camera and the origin.
Camera Calibration
Basic Concepts
Camera calibration covers two areas: lens calibration and tracking calibration.
Lens Calibration
The idea behind lens calibration is that real studio camera lenses always introduce distortions inherent to the lens — things like barrel distortion, center shift, etc. — while the virtual camera (the digital counterpart to the studio camera) renders a geometrically perfect image by default. Lens calibration aligns the two so they match. (Distortion calibration)
Tracking Calibration
The idea behind tracking calibration is that a tracking system can only measure the position and rotation of its tracking device, while virtual production requires the position and rotation of the studio camera’s no-parallax point (near the sensor). Tracking calibration computes the offset between these two transforms.
Basic Calibrator is Aximmetry’s manual camera calibration tool. It’s used to adjust intrinsic and extrinsic camera parameters so that the virtual scene and the real camera share consistent perspective and motion.
Z (Zoom): Represents the minimum magnification value — the lens zoom parameter.
F (Focus): Represents the lens focus distance.
Calibration Steps
1. Configure Camera Properties
Start by setting the camera’s basic parameters in Basic Calibrator:
Sensor Size: Enter the physical sensor dimensions.
Example: Sony FX3 sensor is 35.6 × 23.8 mm.
Camera Height: Measure and enter the actual height of the camera above the floor. This is critical for tracking calibration.
2. Set the Virtual Ground Plane
Pan Virtual: Sets the height of the ground plane in the virtual scene.
Make sure the virtual ground plane aligns with the real floor — this is the reference baseline for all subsequent calibration.
3. Add Calibration Points
Click Add to add calibration points.
Use at least 5 calibration points for better accuracy.
Important notes:
Avoid placing calibration points near the edges of the frame, where lens distortion is greatest.
Distribute points evenly across the central area of the image.
Choose clearly identifiable reference points in the scene (floor marks, wall corners, etc.).
4. Adjust Focal Length
This is the core step. You adjust based on how well the virtual grid tracks the real scene:
Criterion: Pan the camera left/right or up/down and watch how the virtual grid moves relative to real-world markers.
If the virtual grid rotates faster than the real markers: increase Focal Length.
If the virtual grid rotates slower than the real markers: decrease Focal Length.
Method: Incrementally tweak Focal Length and repeat the pan test until the virtual grid perfectly follows the real scene.
5. Verify the Calibration
Test camera movement from different positions and angles.
Confirm that the virtual and real scenes stay in sync in all directions.
If you see drift, add more calibration points or re-tune the parameters.
Tips
Use a stable tripod or fluid head — camera shake degrades calibration accuracy.
Calibrate in good lighting so reference points are clearly visible.
Re-calibrate periodically, especially after swapping lenses or changing focal length.
Save the calibration profile so you can reload it later.
Supported Tracking System Types
Basic Calibrator currently supports calibration for two types of tracking systems:
6DOF (6 Degrees of Freedom)
Definition: Captures the camera’s full spatial position (X, Y, Z) and rotation (Pitch, Yaw, Roll) simultaneously.
Characteristics: Full spatial motion tracking for the camera.
Use cases: High-precision virtual production and mixed reality.
Typical hardware: External professional tracking systems such as OptiTrack, Vicon, etc.
PTZ (Pan-Tilt-Zoom)
Definition: Cameras with pan (horizontal rotation), tilt (vertical rotation), and zoom capabilities.
Characteristics: No full spatial position tracking — primarily tracks rotation and zoom.
Use cases: Studio monitoring or simple virtual production setups.
Typical hardware: PTZ camera systems.
Device Configuration Example
Adding Aximmetry Eye in the Device Mapper:
Important: When using Aximmetry Eye, always connect via a wired ethernet cable to get stable tracking data. Wireless connections can introduce latency and connection drops.
Other Thoughts
The iPhone Sync Problem
Earlier versions of Aximmetry Eye didn’t support timecode or Genlock on iPhone, which creates a bunch of sync headaches.
This forum thread discusses the issue. An interesting question: now that iPhone 17 reportedly supports Genlock, can it be used directly as an external tracker?
The official docs acknowledge this issue too. It affects recompiling third-party plugins and general compatibility.
Aximmetry’s UE build is not the full official source distribution, so recompiling complex C++ plugins — especially those that depend on private modules or rendering pipeline extensions — often fails.
Options:
Use Blueprint-only or pure-asset plugins.
Look for pre-compiled binaries built for this specific engine version.
If you must use a C++ plugin, first verify it works in a vanilla UE 5.5 project, then try running it in Aximmetry’s engine.
Capture Card Format Incompatibility
When setting up the project you may run into issues where the capture card’s model or resolution isn’t detected, or the image goes black after the card disconnects. In that case, unplug and replug the capture card, then restart the software.
Building Our Own XR Tool
We have in-house development needs. Given that Aximmetry’s approach — placing a capture card feed as a flat plane inside the scene — is actually pretty simple logic, I decided to hand-roll a small XR tool. The goal is to use it as a prototype for our larger application: an editor-side tool that handles the entire compositing and rendering pipeline inside UE, without Aximmetry.
The feature set is intentionally minimal:
Ingest a green screen image
Keep the green screen plane always facing the virtual camera (billboard)
Multi-camera switching and multi-camera motion
Full-screen output on a chosen display
Ingesting the Green Screen Image
Create a new level, then add a MediaPlate to the scene.
Import the green screen video (you can drag any UE-supported format directly into the editor panel) and connect it to the MediaPlate.
Duplicate the MediaPlate’s material into a local copy, add an MF_ChromaKeyer node, wire the material graph as shown, and assign the copied material back to the MediaPlate.
Edit the sub-material to select the green color range for keying. Save, and the chroma key is done. I’m using a temporary video clip for now — in production this will be replaced by a live feed from a capture card.
At this point we can display a keyed plate in the scene.
However, the level can’t be saved in this state — the MediaPlate loses its source material when you close and reopen the scene.
So let’s make the material setup persistent:
Create a MediaPlayer asset and set its source to the green screen video file you imported.
Create a MediaTexture asset and point its media source to the MediaPlayer you just created.
Drag the MediaTexture into the MediaPlate’s material and update the input source. After saving, the MediaPlate works correctly on reload. At this point, green screen ingestion is complete.
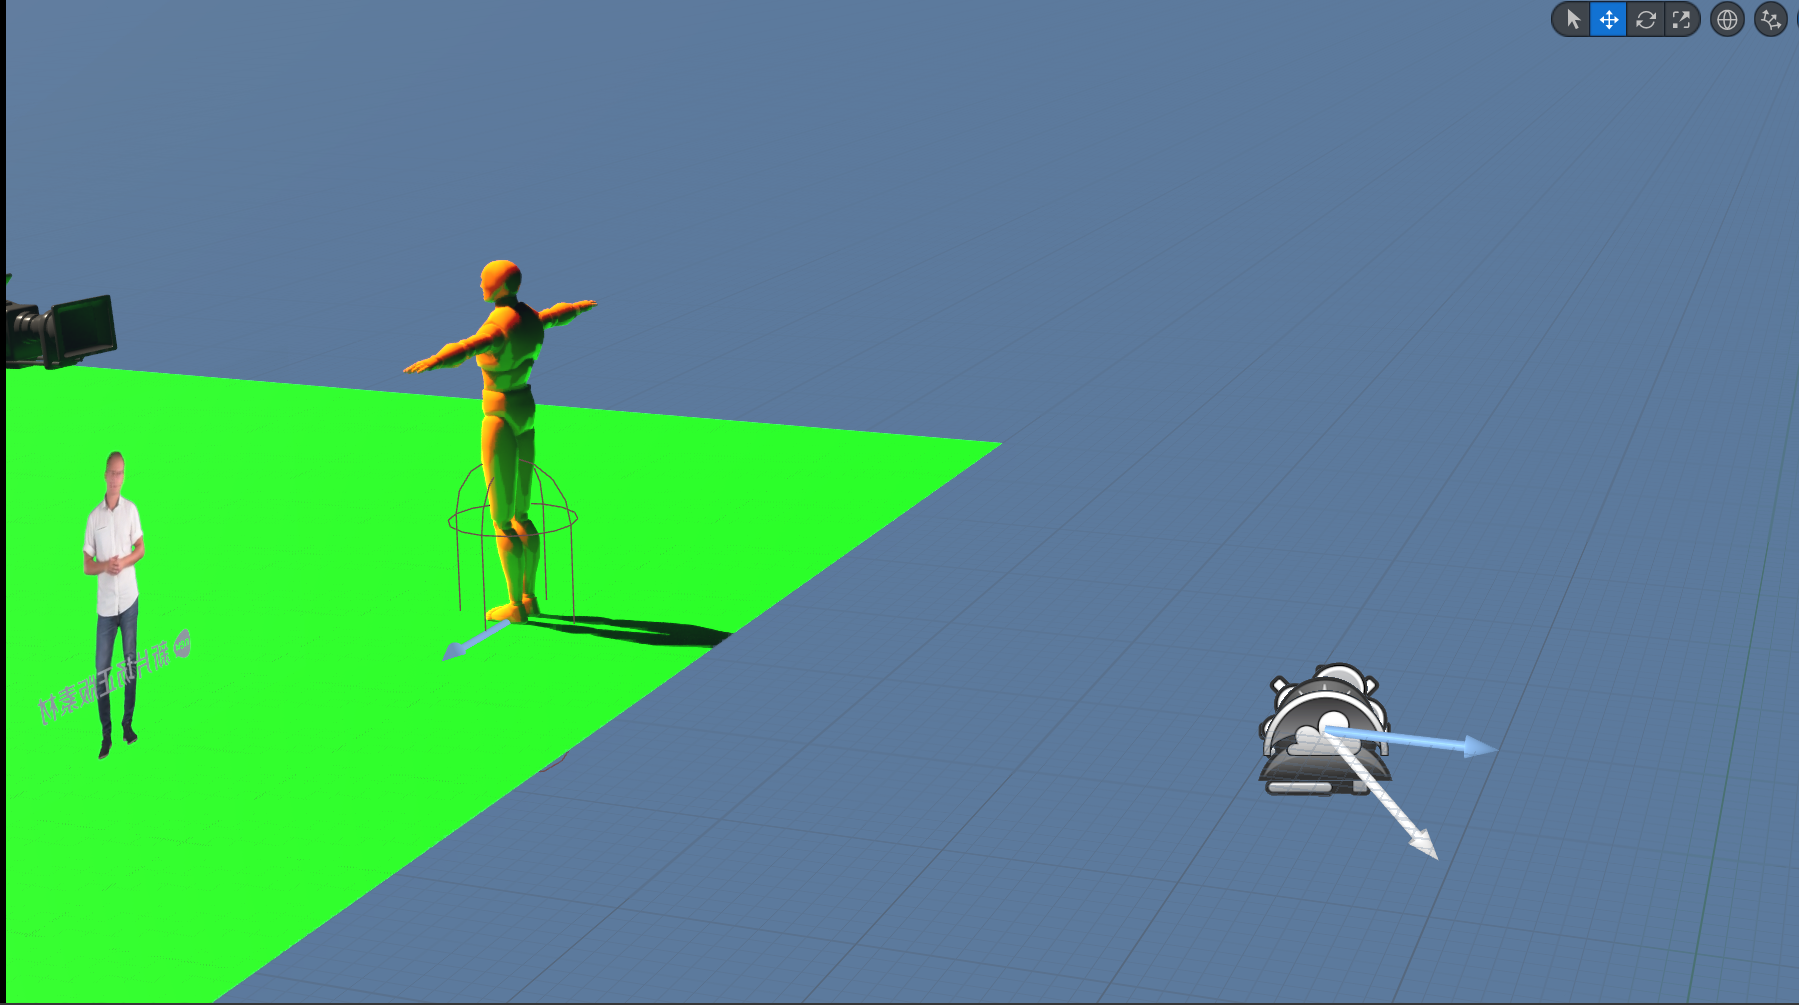
Keeping the Green Screen Facing the Camera (Billboard)
There’s a problem: when we switch camera angles, the flat plate doesn’t follow. We need to configure the plate so it always faces the active camera.
Without it, you get the obvious flat-plane look shown above.
Multi-Camera Switching and Movement
Since we’re controlling UE cameras directly, camera movement works in both Play mode and Editor mode via UE’s Sequencer. However, cut switching between cameras doesn’t work as smoothly out of the box, so I built a small tool to handle fast camera cuts.
At runtime, click the control panel to switch between cameras.
Full-Screen Output on a Chosen Display
Select the target display and output resolution, then push the render to full-screen. During a live broadcast you can have OBS capture that window.
With this, we’ve bypassed Aximmetry and its custom engine entirely — compositing and rendering happen inside standard UE, and we’re free to use stock UE and its open-source plugin ecosystem instead of being locked to Aximmetry’s special engine build.
Of course, this plugin still has a lot of rough edges. Just for fun. There are plenty of issues to solve before it’s production-ready, calibration being the most obvious one.
// Copy camera parameters from the first perspective editor viewport if (GEditor) { for (FEditorViewportClient* VC : GEditor->GetAllViewportClients()) { if (VC && VC->IsPerspective()) { const FVector Loc = VC->GetViewLocation(); const FRotator Rot = VC->GetViewRotation(); constbool bIsOrtho = VC->IsOrtho(); constfloat FOV = VC->ViewFOV; // use source viewport FOV constfloat OrthoWidth = 2048.f; // default ortho width ViewportClient->SetCameraFrom(Loc, Rot, FOV, OrthoWidth, bIsOrtho); break; } } }
// Apply any cached parameters (won't crash if UI triggered setters before Client was created) ApplyCachedParams();
return ViewportClient.ToSharedRef(); }
voidSTcgXRViewport::ApplyCachedParams() { if (!ViewportClient.IsValid()) return; if (CachedFOV.IsSet()) { ViewportClient->SetFOV(CachedFOV.GetValue()); CachedFOV.Reset(); } if (CachedExposure.IsSet()) { ViewportClient->SetExposure(CachedExposure.GetValue()); CachedExposure.Reset(); } if (CachedFocalLength.IsSet()) { ViewportClient->SetFocalLength(CachedFocalLength.GetValue()); CachedFocalLength.Reset(); } if (CachedAperture.IsSet()) { ViewportClient->SetAperture(CachedAperture.GetValue()); CachedAperture.Reset(); } if (CachedFocusDistance.IsSet()) { ViewportClient->SetFocusDistance(CachedFocusDistance.GetValue()); CachedFocusDistance.Reset(); } }
// XR state control interface voidSTcgXRViewport::SetShowKeyed(bool b){ if (ViewportClient) ViewportClient->SetShowKeyed(b); } voidSTcgXRViewport::SetVirtualCamMove(bool b){ if (ViewportClient) ViewportClient->SetVirtualCamMove(b); } voidSTcgXRViewport::SetMixedRealityBlend(bool b){ if (ViewportClient) ViewportClient->SetMixedRealityBlend(b); }
// Utility: get the CineCameraComponent currently locked in any level viewport (Pilot/locked state) static UCineCameraComponent* GetLockedCineCamera() { if (!GEditor) returnnullptr; const TArray<FLevelEditorViewportClient*>& Clients = GEditor->GetLevelViewportClients(); for (FLevelEditorViewportClient* LVC : Clients) { if (!LVC || !LVC->IsPerspective()) continue; AActor* LockedActor = nullptr; if (AActor* CineLock = LVC->GetCinematicActorLock().GetLockedActor()) { LockedActor = CineLock; } elseif (LVC->GetActiveActorLock().IsValid()) { LockedActor = LVC->GetActiveActorLock().Get(); } if (LockedActor) { if (ACineCameraActor* Cine = Cast<ACineCameraActor>(LockedActor)) { return Cine->GetCineCameraComponent(); } } } returnnullptr; }
// Capture keyboard input and dispatch to the module for camera switching FReply STcgXRViewport::OnKeyDown(const FGeometry& MyGeometry, const FKeyEvent& InKeyEvent) { if (FTcgXRModule* Mod = FModuleManager::GetModulePtr<FTcgXRModule>("TcgXR")) { if (Mod->HandleKeyDown(InKeyEvent.GetKey())) { return FReply::Handled(); } } return SEditorViewport::OnKeyDown(MyGeometry, InKeyEvent); }
// Safe parameter setters: prefer modifying the camera locked to the level viewport; // fall back to local cache / ViewportClient otherwise voidSTcgXRViewport::SetFOVParam(float InFOV) { if (UCineCameraComponent* CineComp = GetLockedCineCamera()) { CineComp->SetFieldOfView(InFOV); return; } if (ViewportClient.IsValid()) { ViewportClient->SetFOV(InFOV); } else { CachedFOV = InFOV; } }
// Copyright Epic Games, Inc. All Rights Reserved. // This file is the main module for the TcgXR plugin, handling initialization, UI layout, and command registration.
boolFTcgXRModule::HandleKeyDown(const FKey& Key) { if (TWeakObjectPtr<ACameraActor>* Found = CameraHotkeyMap.Find(Key)) { SwitchToCamera(*Found); RebuildCameraHotkeyUI(); returntrue; } returnfalse; }
voidFTcgXRModule::BindCameraHotkey(TWeakObjectPtr<ACameraActor> Camera, const FKey& Key) { // Ensure a camera only has one binding: remove the old one first TArray<FKey> KeysToRemove; for (constauto& Pair : CameraHotkeyMap) { if (Pair.Value == Camera) { KeysToRemove.Add(Pair.Key); } } for (const FKey& OldKey : KeysToRemove) { CameraHotkeyMap.Remove(OldKey); } // Rebind the key to the new camera CameraHotkeyMap.Add(Key, Camera); RebuildCameraHotkeyUI(); }
voidFTcgXRModule::SwitchToCamera(TWeakObjectPtr<ACameraActor> Camera) { if (!Camera.IsValid()) return; FLevelEditorModule& LevelEditorModule = FModuleManager::LoadModuleChecked<FLevelEditorModule>("LevelEditor"); TSharedPtr<SLevelViewport> ActiveViewport = LevelEditorModule.GetFirstActiveLevelViewport(); if (!ActiveViewport.IsValid()) return;
voidFTcgXRModule::RefreshCameraList() { CachedCameras.Reset(); if (GEditor) { UWorld* World = GEditor->GetEditorWorldContext().World(); if (World) { for (TActorIterator<ACameraActor> It(World); It; ++It) { CachedCameras.Add(*It); } } } RebuildCameraHotkeyUI(); }
voidFTcgXRModule::RebuildCameraHotkeyUI() { TSharedPtr<SVerticalBox> Panel = CameraListPanel.Pin(); if (!Panel.IsValid()) return; Panel->ClearChildren();
// Show currently controlled camera at the top Panel->AddSlot().AutoHeight().Padding(0,2) [ SNew(STextBlock) .Text_Lambda([this](){ returnGetCurrentControlledCameraText(); }) ];
// FTcgXRViewportClient implementation has been moved inline to TcgXRViewportClient.h
// This translation unit is intentionally left empty to avoid duplicate definitions.
// TcgXR custom Viewport widget — supports XR scene display and camera control classSTcgXRViewport : public SEditorViewport { public: SLATE_BEGIN_ARGS(STcgXRViewport) {} SLATE_END_ARGS()
// XR state control interface voidSetShowKeyed(bool b); // toggle chroma key display voidSetVirtualCamMove(bool b); // toggle virtual camera movement voidSetMixedRealityBlend(bool b); // toggle mixed reality blend
boolIsShowKeyed()const; // is chroma key display active? boolIsVirtualCamMove()const; // is virtual camera movement active? boolIsMixedRealityBlend()const; // is mixed reality blend active?
// Access the underlying ViewportClient (used to copy camera/params to other viewports) TSharedPtr<FTcgXRViewportClient> GetClient()const { return ViewportClient; }
// Safe camera parameter setters: if the Client isn't ready yet, cache values for later application voidSetFOVParam(float InFOV); voidSetExposureParam(float InExposure); voidSetFocalLengthParam(float InFocal); voidSetApertureParam(float InAperture); voidSetFocusDistanceParam(float InFocus);
classFTcgXRModule : public IModuleInterface { public: /** IModuleInterface implementation */ virtual voidStartupModule() override; virtual voidShutdownModule() override; /** This function will be bound to Command. */ voidPluginButtonClicked();
// Hotkeys: handle a key press (called by STcgXRViewport), returns true if handled boolHandleKeyDown(const FKey& Key); // Hotkeys: bind a camera to a specific key voidBindCameraHotkey(TWeakObjectPtr<ACameraActor> Camera, const FKey& Key); // Switch the level viewport to a specific camera voidSwitchToCamera(TWeakObjectPtr<ACameraActor> Camera); // Refresh camera list and rebuild UI voidRefreshCameraList();
// Close all fullscreen windows voidCloseAllFullscreenWindows();
// Display the currently controlled camera name FText GetCurrentControlledCameraText()const; // Get the display text for a camera's bound hotkey FText GetBoundKeyTextForCamera(TWeakObjectPtr<ACameraActor> Camera)const; private: voidRegisterMenus();
// Spawn the XR viewport tab TSharedRef<class SDockTab> OnSpawnPluginTab(const class FSpawnTabArgs& Args);
// Rebuild the camera hotkey binding UI voidRebuildCameraHotkeyUI();
// Render the main editor world so this viewport stays in sync with the main scene virtual UWorld* GetWorld()const override { return (GEditor) ? GEditor->GetEditorWorldContext().World() : nullptr; }
// Copyright Epic Games, Inc. All Rights Reserved.
using UnrealBuildTool;
publicclassTcgXR : ModuleRules { publicTcgXR(ReadOnlyTargetRules Target) : base(Target) { PCHUsage = ModuleRules.PCHUsageMode.UseExplicitOrSharedPCHs; PublicIncludePaths.AddRange( newstring[] { // ... add public include paths required here ... } ); PrivateIncludePaths.AddRange( newstring[] { // ... add other private include paths required here ... } ); PublicDependencyModuleNames.AddRange( newstring[] { "Core", // ... add other public dependencies that you statically link with here ... } ); PrivateDependencyModuleNames.AddRange( newstring[] { "Projects", "InputCore", "EditorFramework", "UnrealEd", "ToolMenus", "CoreUObject", "Engine", "Slate", "SlateCore", "AppFramework", "LevelEditor", "CinematicCamera", // cinematic camera support // ... add private dependencies that you statically link with here ... } ); DynamicallyLoadedModuleNames.AddRange( newstring[] { // ... add any modules that your module loads dynamically here ... } ); } }